 FAQ&KB home
 Search
 Mechatronics home
Send Feedback
Mechatronics home
Send Feedback
 Print
Print
Dilution
General information Dilution:
One prime cycle has a duration of about 20 seconds. 5 strokes are used for priming the diluter.
With a dilution rate of 100% the piston in the syringe is halfway plus/minus 5 millimeters between the home sensor and the top sensor.
When old blood is used, the Auto Dilution Correction Rate (ADCR) will settle to the wrong average. It is therefore important to use freeze blood not older then 8 hours to stabilize this error correction number.
Dilution errors up to 20% have only a small and acceptable influence on the test results.
Switch OFF the auto dilution correction when you need to run test samples without changing the setting.
The dilution rate is 1 part of diluent and 4 parts of blood.
The motor speed of the syringe is calculated by using the flow information which comes from the flow sensor board.
When the software is set into the run mode the diluter will move the syringe about 5 mm upwards. This action is needed to make sure the diluent is at the needle entrance. During the aspiration the syringe is moving upwards.
After the aspiration the syringe is still moving upwards, this motion is used for washing and cleaning the mixing piece by using the remaining diluent in the syringe.
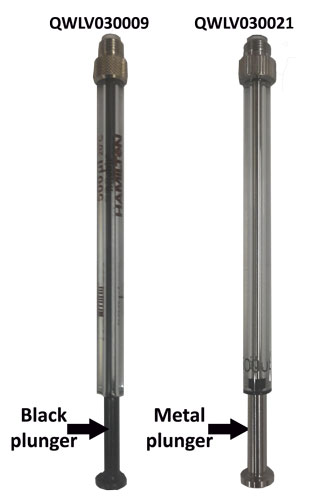
In 2019 a new Diluter syringe (article number QWLV030021) is introduced as replacement of QWLV030009. This new syringe has only to be replaced after 2 years service. No tip replacement is necessary anymore.
Since 2015 the Diluent flow sensor is renewed, ESRI060951 (with a ball) is replaced with ESRI060954. See Replacement of the EDTA electronic dilution flow sensor for modification instructions.
Software
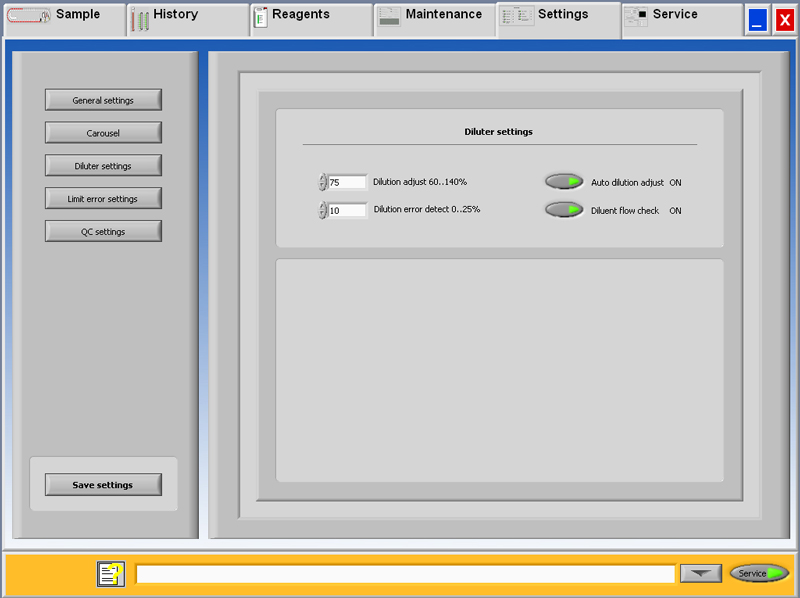
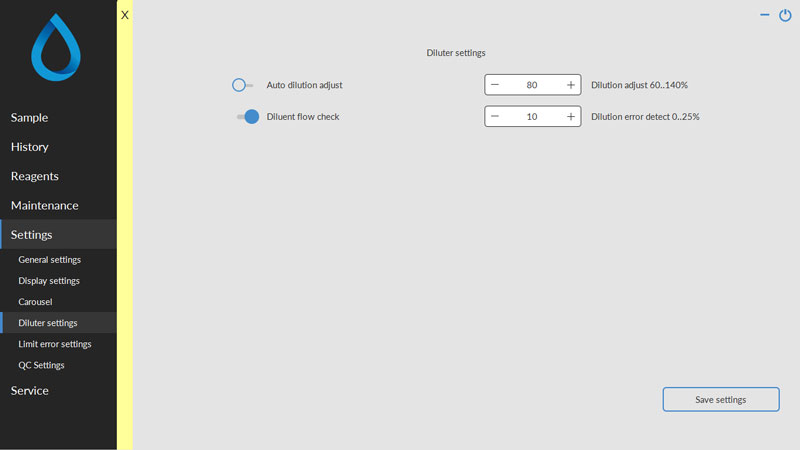
Dilution adjustment 60 till 140%
For adjusting the dilution rate: run a number of sample tubes filled with fresh blood. Write down the dilution rate, which is shown in the numerical window.
By entering the percentage deviation, a correction value can be made.
Example: The average dilution rate is 92%, enter 108 in order to correct to a 100% dilution rate.
Dilution error detection 0 till 25%
Dilution Error deviation report. If a dilution error occurs during the aspiration sequence, an audible alarm sounds and the deviation value will be shown on the screen. When the measure unit has evaluated the sample, the deviation value will be printed after the text "EDTA"
Sending or not sending results with dilution errors to the output is optional, see Limit error settings (Limit error settings, Limit error settings).
Example: Dilution error detection is set at 10%. When the dilution error is outside the 10% range, in the last column of the report EDTA 079 or EDTA 121 is printed which indicating this sample is 21% under or over diluted.
Auto dilution adjust
The Automatic Dilution adjust default setting is: ON.
This feature automatically corrects the dilution rate. If the dilution rate tends to get too low or too high, it automatically makes a correction to the (manual) "dilution adjust" setting
In this way long term instability or long term changes will be corrected. The system "looks" to the mean average of the 32 last dilutions to estimate the corrections on the syringe speed calculations.
If Auto dilution adjust is set to OFF the system works with the number which is set in Dilution adjustment 60 till 140%.
If Auto dilution adjust is set to ON the software automatically set the Dilution adjustment 60 till 140%.
Instructions to set-up the Auto dilution adjust
Set the Auto dilution adjust OFF. Set in Settings - General settings Display dilution ON.
Run a few representative fresh blood samples of the day and note the dilution rates which are displayed at the status line.
Add the found dilution rate and take the average. By entering the percentage deviation, a correction value can be made.
Example: If the average dilution rate is 92%, enter 108 in order to correct to a 100% dilution rate.
If no input is given, a warning <Out of range> is displayed.
Note: Use only recent samples (<12 hours), otherwise the software settings will not be representative.
- Set the average dilution rate in Dilution adjust 60%…140%
- Run more samples, to inspect the dilution rate again
- If the dilution rates are in expectation, continue to the following steps
- Set Auto dilution adjust ON
- Run a few more samples to inspect the dilution rate again
Diluent flow check:
The Diluent flow check is default switched ON.
When the flow sensor is still giving errors after troubleshooting and there are no detectable faults in the liquid flow, use the switch OFF function. This check is now not active, call for service.
Dilution information
Before aspirating, the citrate system must be free of air bubbles.
Select Maintenance-> Prime -> Prime Diluent, vacuum pump is on and system must be filled with Diluent. When the citrate is priming, liquid should be seen flowing through the tube connection to the fill nozzle cap.
Occasionally when the diluter system is primed for the first time, air locks occur in the tubing and the diluter will not self-prime. If this occurs, disconnect the luer fitting at the syringe and connect a syringe filled with Diluent to the tubing and fill system manually.
- Check pick-up tube at the Diluent container, it may be kinked.
- One of the Diluent lines has become blocked or kinked.
- Check if all tubes are still connected.
- Check if the 2 tubes (ESRI070508) are still connected with the tubes ESRI070406.
- Check if the 2 tubes positioned correctly in the pinch valve.
If the display shows dilution errors it indicates that the current sample has not been diluted correctly e.g. -21% Diluent added to the sample. After the sample measurement the dilution rate will be printed as: EDTA 079.
A (partly) blocked sample flow will be signaled by a time-out on the filling time.
A (partly) blocked diluent flow will be signaled by the flow sensor at the first or the second instance that it occurs.
Dilution errors can be caused by: |
Solution |
Irregular filling speed due to poor vacuum. |
Check the vacuum settings. |
Blocked sample probe. |
Remove the blockage. |
Blocked mixing piece. |
Unblock the the mixing piece by using a syringe with hot water. |
Sample tube pinch valve error. |
Check if the sample tube pinch valve is working. |
Sample tube not correct in the sample tube pinch valve. |
Check the sample tube is still fitted correctly in the pinch valve. |
Insufficient sample volume. |
Check before sampling if the sample tube has sufficient blood volume. |
Wrong diluter settings |
Check/change diluter settings in software: See Diluter settings (Diluter settings, Diluter settings) for all possible settings |
When all the mentioned solutions does not help to solve the problem only allowed for a trained technician.
Display shows "Diluter failure"
May be caused by:
- Mechanical obstruction.
- Diluter power cable loose.
- A defective diluter motor.
- Top or bottom position sensor failure.
- Broken flexible print cable or connector.
- Motor tacho failure.
For Diluter failure only allowed for a trained technician.
- Check the diluter syringe tip.
- Check on the Mixing-piece joints and connectors for leaks and replace if necessary.
- Check the connectors on the EDTA flow sensor for leaks and replace if necessary.
Select Maintenance-> Prime -> Prime Diluent, vacuum pump is on and system must be filled with Diluent. When the citrate is priming, liquid should be seen flowing through the tube connection to the fill nozzle cap.
Occasionally when the diluter system is primed for the first time, air locks occur in the tubing and the diluter will not self-prime. If this occurs, disconnect the luer fitting at the syringe and connect a syringe filled with Diluent to the tubing and fill system manually.
- Check pick-up tube at the Diluent container, it may be kinked.
- One of the Diluent lines has become blocked or kinked.
General reference:
Diluter assemblies for:
Interrliner and Starrsed Compact: ESRI069100
Starrsed RS: VERA069000
Starrsed TL: TLAX050911
Starrsed ST: part of filling unit BANG039000
In This Section |
See Also |
Mechatronics home
Send Feedback
Print
|
Page last reviewed: 18/07/2019 15:01:52 ©2019 RR Mechatronics |