 Manual home
Send Feedback
Manual home
Send Feedback
 Print
Print
|
|
|
|
|
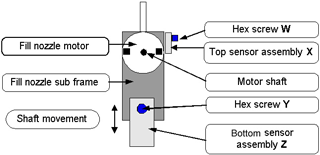
Help to make the correct sensor adjustment
- Loosen the hex screw Y and move the sensor assembly Z up or downwards, tighten the hex screw.
- Use the arrow key’s to operate the fill-nozzle assembly.
- Repeat the complete alignment procedure several times in order to achieve the correct alignment and that LED 1 comes ON then LED 2 comes ON. See LED status D.
- Repeat earlier described steps in order to check the adjustment.
- Moving up the sensor assembly Z may cause the fill-nozzle to be pushed up too far, this needs to be checked.
Note: This will damage the motor gearbox!!
See Also |
Mechatronics home
Send Feedback
Print
|
Page last reviewed: 03/05/2010 10:59:44 (Version: MRN--EN) ©2019 RR Mechatronics |