 Manual home
Send Feedback
Manual home
Send Feedback
 Print
Print
|
|
|
|
|
Sensor adjustment (diluter)
Diluter start sensor adjustment:
If applicable some covers and back plates have to be removed in order to reach and adjust the TRIM-POT R15 in the diluter itself.
However, before any adjustments are made, the sensor needs to be checked and cleaned. Undo the hex screw holding the sensor board on transparent mixing-piece and remove the sensor board vertically. It is possible that the transparent mixing-piece has become dirty.
Before making any adjustments check the following items;
- The Diluter start sensor must be in the default range. Default value 400-700.
- See Menu selection (diluter) to perform this task.
- If incorrect make the adjustment by the TRIMPOT R15 on the diluter board, see PCB Diluter.
DO NOT USE ALCOHOL OR OTHER ORGANIC SOLVENTS TO CLEAN THE PLASTIC mixing-piece, these solvents may destroy this part!
All cable connections to this board are numbered. Make sure that if the cables have been removed, they are plugged into the correct sockets again.
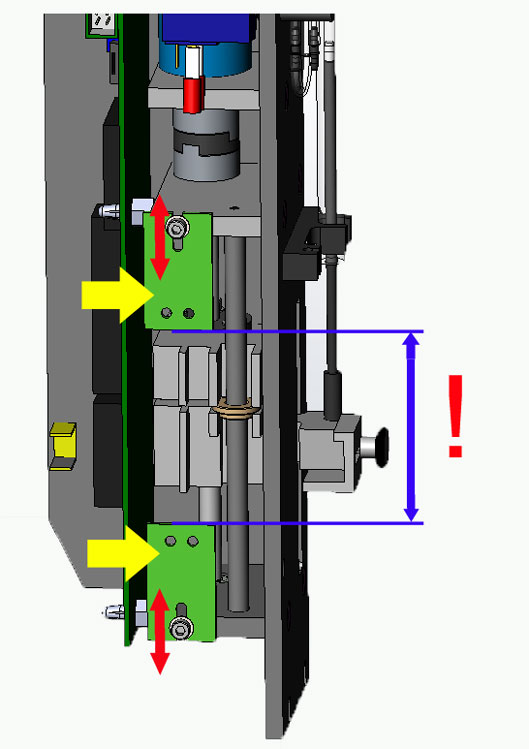
Diluter stroke adjustment:
- Measure the distance between the two sensors. Normally the distance is 58.5 mm
- Remove the faulty sensor and instal the new sensor.
- Measure the distance between the two sensors and move the new sensor till the measured distance is reached.
In This Section |
See Also |
Mechatronics home
Send Feedback
Print
|
Page last reviewed: 17/12/2018 10:56:46 (Version: MRN--EN) ©2019 RR Mechatronics |