 Manual home
Send Feedback
Manual home
Send Feedback
 Print
Print
|
|
|
|
|
All positions of the robot arm can be calibrated. All positions within the instrument are calibrated at the factory for testing, but has to be checked/re-calibrated after mounting the robot arm on site. Also the track position has to be re-calibrated on location before first use.
If the gripper picks tubes not correctly (e.g. if other tubes are used), the gripper and all positions have to re-calibrated before first use. The "Home"-position cannot be adjusted and is already defined through the "System calibration".
Other positions can be calibrated individually if needed and each new calibrated position can be checked with the the manual movement functions on the Service-TLAX settings screen. (If necessary with all used sample tube types).
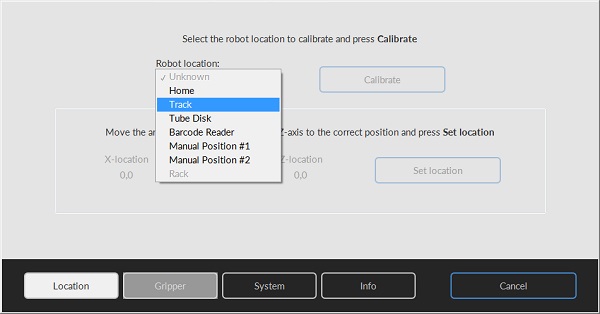
Start with Go to Service - TLAX settings - Service and press Calibrate.
Calibration of Track position:
- Choose "Track".
- Place a tube transporter with tube to the track position.
- Press "Calibrate" (the robot arm is set free and can be moved manually).
- Move robot arm on the correct horizontal position: centered just above the tube cap.
- Move robot arm downwards until the fingers from the gripper are just below the tube cap.
- Press "Set location".
Calibration of tube disk position:
- Choose "Tube Disk".
- Set tube disk with leg number 1 at in/out position (with the movement options at Service screen).
- Place a tube in the tube disk at in/out position.
- Press "Calibrate" (the robot arm is set free and can be moved manually).
- Move robot arm on the correct horizontal position: centered just above the tube cap.
- Move robot arm downwards until the fingers from the gripper are just below the tube cap.
- Press "Set location".
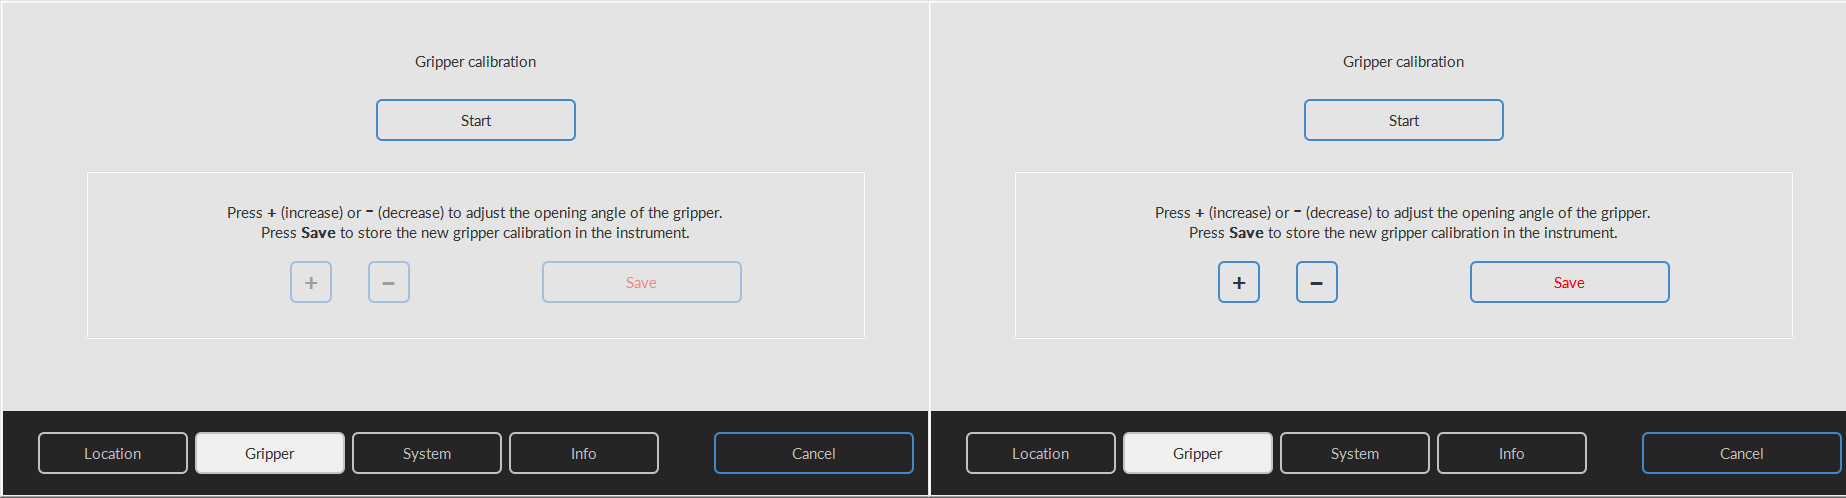
Calibration of the gripper.
With calibration gripper, the width of the gripper can be adjusted. Use one or more common used sample tube(s) for reference.
- Press "Calibrate" and choose "Gripper".
- Press start.
- Adjust the gripper to the maximum setting with "+" button at first.
- Adjust the gripper to the correct width with the "-" button.
- Press Save.
- Check the settings with the the manual movement functions on the Service-TLAX settings screen. (If necessary with all used sample tube types)
Calibration of Barcode Reader position:
- Choose "Barcode Reader".
- Place a tube in the gripper (with the movement options at Service screen).
- Press "Calibrate", the robot arm moves to the first barcode reader. The robot arm is set free and can be moved manually.
- Move robot arm carefully (and if necessary the tube itself) by hand until the barcode appears as expected on the screen.
- Press "Set location".

Calibration of Manual Position #1 and #2 (Calibrate always two positions):
- Place tubes on manual position #2 (which is located at the front of the instrument) and #1 inside the instrument.
- Choose "Manual position #1".
- Press "Calibrate" (the robot arm is set free and can be moved manually).
- Move robot arm on the correct horizontal position: centered just above the tube cap.
- Move robot arm downwards until the fingers from the gripper are just below the tube cap.
- Press "Set location".
- Choose "Manual position #2".
- Press "Calibrate" (the robot arm is set free and can be moved manually).
- Move robot arm on the correct horizontal position: centered just above the tube cap.
- Move robot arm downwards until the fingers from the gripper are just below the tube cap.
- Press "Set location".
- Check with use of the movement controls if a tube is picked and released from manual position #1 and #2.
Rack input calibration
With calibration rack input, the pick-up position rack input can be adjusted.
- Choose "Rack".
- Place a tube in the rack on position 1.
- Move rack to IN position (with use of the movement options at Service screen).
- Press "Calibrate", the robot arm moves to the rack input position
- Move robot arm carefully by hand until the fingers of the gripper arms are just below the tube cap.
- Press "Set location".
See Also |
Mechatronics home
Send Feedback
Print
|
Page last reviewed: 07/06/2019 08:25:37 (Version: MRN--EN) ©2019 RR Mechatronics |